- Premiere Tutotial
What Is Submix? How to Use Submix in Premiere Pro
Apr 29,2019• Proven solutions
When it comes to editing pure audio tracks or the audio component of video tracks, it's important to simplify your workflow in a way that allows you to control key components of your audio track and improve the quality of your final output. This is where submixing comes in.
- Part 1: What is Submix
- Part 2: How to Create a Submix in Premiere Pro
- Part 3: How to Use Submix in Premiere Pro
Part 1: What is Submix
An audio submix is an intermediate output track where you can group a set of related or connected audio clips or tracks so that the same effects or treatments can be applied to them simultaneously.
You could send recorded clips from the same musical instrument to one submix so they can be edited as a group. You could also send a group of related signals such as the components of a dialogue or background sound like footsteps, background music, the sound of moving cars, etc, to one submix so they can be processed for a more natural background sound in a video.
Once you are satisfied with the effects you've applied to your submixes, you can them route them to the master track to generate the final audio output. Most advanced multimedia editors like Premiere Pro make it easy to create a submix but will not allow for tracks to be recorded directly to a submix. That's because a submix is a feature for audio editing and mixing.
Premiere Pro also allows users choose how much of the signal of an audio track will be sent to a submix and in this way, lets users choose which sounds will be highlighted in the final audio track.
Part 2: How to Create a Submix in Premiere Pro
There are a number of ways to create submix tracks in Premiere Pro.
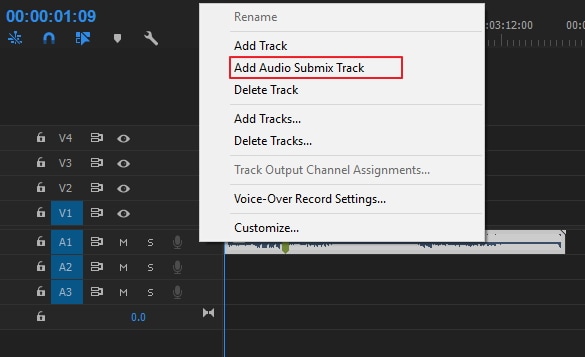
- Right click or control click the TRACK HEADER and in the context menu, select ADD AUDIO SUBMIX TRACK.
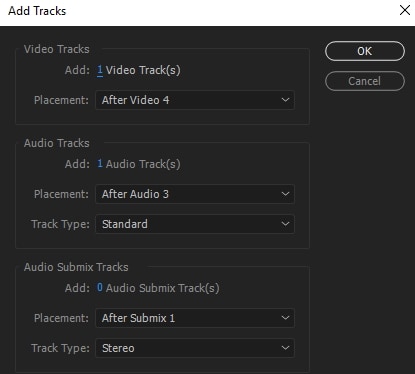
- Click the SEQUENCE MENU in the top menu bar, click ADD TRACKS and in the pop-out menu, enter the number of submix tracks in the section labelled AUDIO SUBMIX TRACK.
- Click on the WINDOWS menu and select AUDIO TRACK MIXER. When the AUDIO TRACK MIXER pops out, click the small arrow button to pull down the EFFECTS menu. Under the EFFECTS menu, there’s a SUBMIX section where you can choose if you want to create a MONO, STEREO or 5.1 SURROUND submix track.


Part 3: How to Use Submix in Premiere Pro
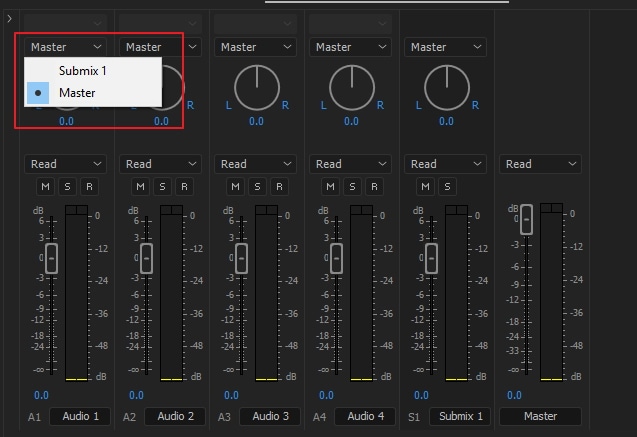
Once your submix has been created, it will appear as a new track to the right of your existing tracks panels and just before the master track in the AUDIO TRACK MIXER window.
- The first thing to do after creating the submix is to route/send the desired audio tracks to it. To do this, go to the panel for each track in the AUDIO TRACK MIXER and in the TRACK OUTPUT/SEND ASSIGNMENT menu which is set to MASTER by default, click the down arrow and select the SUBMIX as the output. Note that the submix itself is set to output to the MASTER TRACK.
- With all desired tracks sent to the submix, applying an effect to the submix will apply the effect to all the tracks routed or sent to the submix.
- Be sure to adjust the signal output dial for each track to choose how much of a track’s signal to send to the submix. This will let you achieve more nuanced effects and a more natural sound to your audio track.
Conclusion
If you want to edit audio in an easier way, here we recommend using FilmoraPro. It is a powerful video editor that you can sync audio to video automatically. You can also equalize the highs and lows of your audio to normalize the volume of your clips. Besides, you can also apply crossfades or overlap audio to smooth the sound between clips. Download it now to have a try (free)!
Bring up your video to a professional level with straightforward tools.
Try It Free Try It Free


Liza Brown
chief Editor
0 Comment(s)